Building a Simple Wooden Boat on a Shoestring
The allure of building your own boat is undeniable. The smell of fresh-cut wood, the satisfying rhythm of hand tools, and the final triumph of seeing your creation afloat – it's a deeply rewarding experience. But the daunting cost and complexity of traditional boatbuilding often deter many aspiring shipwrights. This article demonstrates how to construct a small, functional wooden boat using minimal tools and a budget-friendly approach, focusing on practicality and simplicity.

Choosing Your Design: Simplicity is Key
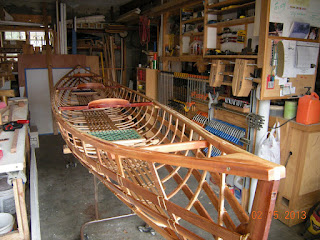
Forget elaborate designs and complex joinery. For a beginner's boat, simplicity reigns supreme. Consider a simple "clinker-built" design, where overlapping planks form the hull. This method requires less precise woodworking skills and fewer specialized tools. You can find free plans online for small, lightweight boats like rowboats or small canoes. Look for plans specifying readily available lumber like plywood or readily sourced cedar. Remember, the smaller the boat, the easier and cheaper it will be to build.
Essential Design Considerations:
- Size: Start small! A manageable size minimizes material costs and construction time.
- Shape: Simple, rounded shapes are easiest to build.
- Materials: Opt for affordable and readily available wood like plywood or inexpensive cedar.
Gathering Your Minimalist Tool Kit
You don't need a fully equipped workshop. A surprisingly small set of tools will suffice. Focus on versatile tools that can handle multiple tasks. Forget the fancy power tools; this project emphasizes the satisfying work of hand tools.
The Essential Tools:
- Hand saw (a coping saw is particularly useful for curved cuts)
- Measuring tape and pencil
- Hammer
- Chisel (a small one will suffice)
- Screwdriver (or drill if you own one)
- Clamps (at least two)
- Wood glue
- Waterproof sealant (exterior grade)
Building Your Boat: A Step-by-Step Guide
Once you've selected your plan and gathered your tools, you can begin construction. Remember, accuracy is paramount; take your time and carefully follow the plans. Start by cutting the planks according to the plan. Next, apply wood glue to the overlapping edges and clamp them firmly in place, ensuring they are aligned correctly. Leave the clamps in place until the glue is completely dry.
The Construction Process:
- Cut the planks precisely: Accuracy is crucial for a watertight hull.
- Apply glue and clamps carefully: Ensure a strong bond between planks.
- Allow ample drying time: Do not rush this crucial step.
- Seal the seams: Apply waterproof sealant to all seams and joints to prevent leaks.
Once the hull is complete, you can add simple features like thwarts (cross-pieces for seating) and gunwales (the upper edge of the hull). You may need to use additional screws or nails to secure these features. Finally, apply a final coat of waterproof sealant to protect the wood from water damage.
Launching and Beyond: Enjoy Your Creation
After all your hard work, the most exciting part arrives: launching your handcrafted boat! Choose a calm body of water for your maiden voyage. Carefully inspect your boat for any leaks. Enjoy the sense of accomplishment that comes with successfully building and launching your own boat – a testament to your ingenuity and persistence. Remember that this is a basic boat; don't expect it to handle rough waters or extreme conditions.
Building a boat on a minimal budget requires patience, precision, and a willingness to embrace simplicity. However, the rewards – both the boat itself and the journey to its creation – far outweigh the challenges. So gather your tools, choose your plan, and embark on this fulfilling adventure!


0 comments:
Post a Comment